Salted egg yolk cookies for Chinese New Year

I have admittedly not been posting anything on the blog for a while. Since June 2015, to be exact! Rest assured that I have continued to cook, bake and eat, but have just not gotten around to getting the recipes onto the blog – they do make it onto my instagram feed/stories though.

I first started the blog as a way to keep all my recipes in one place, mainly because I would otherwise forget what I put into a particular dish.  I have now fallen into the same habit, which is when I figured that I should start blogging again.

salted egg yolk cookie 4

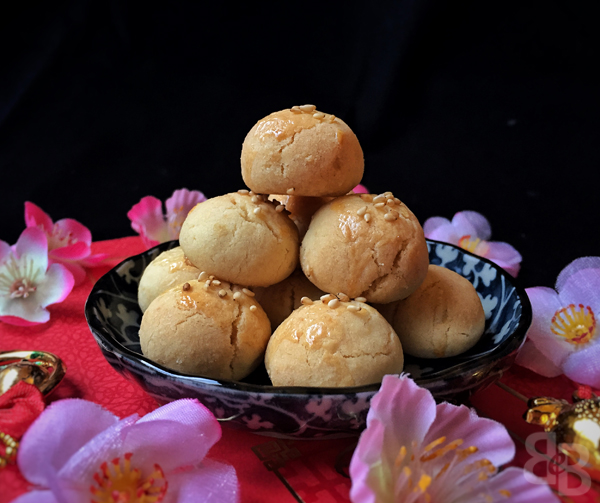
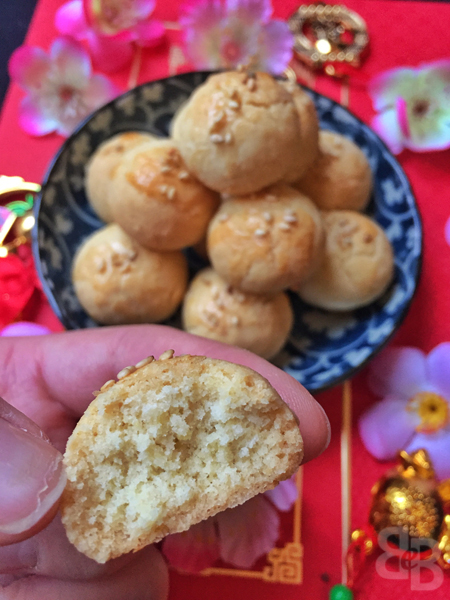
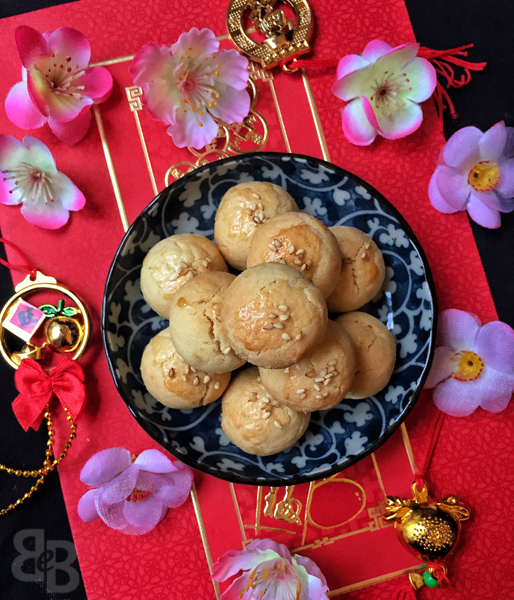
The salted egg yolk craze has been taking over recently – salted egg potato chips, fish skin, cookies etc. I’ve only tried the fish skin and potato chips (I prefer the former!), and can totally see why so many people have gone crazy over them. I have never actually tried salted egg yolk cookies, so actually had no idea what I was aiming for when I made these. I used a recipe I found online as a base, and went from there.

This recipe makes a slightly crunchy cookie, with a nice hint of salted egg yolk. I personally think it could do with a bit more of salted egg yolk, so may increase the ratio of yolk:flour next time. I’ll definitely also be trying to make a more ‘melty’ cookie to see which texture is better!

salted egg yolk cookie 1

Salted egg yolk cookies

  • 150g salted butter, softened
  • 75g caster sugar
  • 6 cooked salted egg yolks, mashed
  • 300g flour
  • 15g cornflour
  • 1 egg, lightly beaten (for egg wash)
  • Sesame seeds (for garnish, optional)
  1. In a stand mixer fitted with the paddle attachment, beat the butter and sugar until pale and creamy
  2. Add the mashed salted yolks, and mix until just combined.
  3. Add the flour/cornflour mix in 2 additions, again mixing until just combined. The mix should form a cohesive dough. You can test this by trying to form a ball from the dough – if it is too crumbly, add a any flavourless oil (corn oil, vegetable oil etc) 1 teaspoon at a time until the dough can be formed into a ball.
  4. Roll the dough into rounds, and place on a parchment/silpat lined baking tray.
  5. Preheat the oven to 165’C (fan assisted).
  6. Gently brush the beaten egg onto the top of each cookie, and top with sesame seeds if you wish.
  7. Bake the cookies in the preheated oven for 10-12 mins, until the cookies are just golden.
  8. Leave to cool, then eat!
salted egg yolk cookie 2


salted egg yolk cookie 3

Kee chang / Alkaline rice dumplings

The Dragon Boat Festival is something I look forward to every year, for two reasons. One – it means summer has ‘officially’ begun. And more importantly – it means it is chang/zong zi (粽子) season.

I previously made bak chang (肉粽), and in that post I said I would have to learn how to make the sweet version: kee chang / jianshui zong (碱水粽) / alkaline dumplings… and I have! For those of you who have not heard about these little morsels, they are eaten as a sweet snack or dessert. They get their name because the glutinous rice is pre-treated with alkaline/lye water, which gives the rice its distinctive yellow colour. They often do not contain any fillings, and are eaten with a sugar syrup or kaya (Malaysian coconut jam).

kee chang 2

kee chang 3

I genuinely did not know how this was going to go, as I did not have a proper recipe to follow. Thankfully, they turned out reasonably well. I would do a few things differently next time though:
– Boil for 1.5-2 hours (I only boiled them for 1 hour and the rice was a not ‘mushy’ enough for my liking)
– Leave the rice for 60 mins at most (I left them for 3 hours and they had a very slight bitter aftertaste)
I’ve tweaked the recipe accordingly to reflect these changes.

The next ‘chang’ I’ll have to make will be the Nonya bak chang / Nonya zong (娘惹粽) – which is filled with pork, candied winter melon and peanuts. Watch this space!

kee chang 1

Kee chang / Alkaline dumplings
Makes 10-12 dumplings

For the kee chang:
– 200g glutinous rice
– 1/2 tbsp alkaline water
– 20 fresh, young bamboo leaves
– Cooking string/hemp leaves

The day before:
1. Wash glutinous rice until the water runs clear. Place rice in a tub, cover with water, and leave to soak overnight.
2. Wash the bamboo leaves, and leave to soak overnight.

On the day:
3. Drain the glutinous rice.
4. Add the alkaline water, and stir this through the rice. Leave aside for 30 min.
5. Whilst waiting for the alkaline water to permeate the rice, drain the water from the bamboo leaves. Pat the leaves dry with a cloth – it doesn’t matter if they are still slightly wet.
6. Select two leaves, and place them in opposite directions (i.e. the tail end of one lining up with the top end of the other). Do not use any leaves which already have holes in them, as they will cause water to seep into the bak chang during the cooking process.
7. Form leaves into a cone.
8. Fill the cone with the glutinous rice, until you reach the brim of the cone.
9. Fold the leaves around the pouch, and secure with cooking string/hemp leaves.
10. Boil water in a heavy based pot. When the water comes to a boil, gently lower the kee changs into the water. Make sure all the changs are completely submerged in water. Cover the pot with a lid, and cook over medium heat for 1.5-2 hours hours. (* I only boiled them for 1 hour, and think they would benefit from a longer cooking time to make the rice softer).
11. Leave to cool, and serve with palm sugar syrup.

For the palm sugar syrup:
– 200g gula melaka (palm sugar)
– 200ml water
– 2 pandan leaves

1. Place the palm sugar, water and pandan leaves in a pan.
2. Bring the ingredients to a boil, and simmer for 15 minutes until the syrup thickens.
3. Strain and leave to cool.
4. Serve with kee changs, and enjoy! (This syrup also works well with ice cream and yogurt)

kee chang 4

Revisited: Chinese New Year Pineapple ‘nastar’ tarts

Ah, it’s that time of year again. The time of year where the baking madness begins.

Pineapple tarts are, to me, synonymous with Chinese New Year. It simply is not Chinese New Year without them. Having said that, they are one of the more time consuming treats to bake, when compared to something like almond or peanut cookies. Cooking the pineapple jam took almost 3.5 hours! (It’s worth taking the time to cook out the jam though, as there was one year where I had a lazy moment – leading to wet jam, and thus a perfect environment for mould…)

chinese new year pineapple cookies 5

I thought I’d try a new recipe this year, and found a recipe from Sonia of Nasi Lemak Lover. It had rave reviews, so I tweaked it marginally, and went with it. They turned out well, and I love the fact that it utilises one of my favourite ingredients: condensed milk! They do not end up milky or too sweet, so fear not.

I’ve learnt a lot since my first attempt at making these, and my tips for making pineapple nastar tarts are as follows:
– Roll out your jam into rolls beforehand.
– Pipe out rolls of pastry beforehand.
– Have your pastry at room temperature as it is easier to pipe/push room temperature dough through the nastar mould. (This may be different in a humid environment, but in a cold country/during winter I definitely recommend room temperature pastry.)
– Do not let your nastar mould get oily. You will totally lose your grip if this happens, and things will rapidly become more difficult.
– Be gentle with your pastry, as you do not want to destroy the beautiful zigzag nastar design on the pastry.

chinese new year pineapple tarts 1

chinese new year pineapple cookies 6

Chinese New Year Pineapple nastar tarts
Based on a recipe from Nasi Lemak Lover
Makes 80 large tarts (you may get more if you make smaller ones)
 
For the pastry:
  • 350g salted butter, at room temperature\
  • 100g condensed milk
  • 470g plain flour
  • 40g cornflour
  • 2 large egg yolks
  • 700-750g pineapple jam (I used 2 1/2 large pineapples)
    • roll into individual balls/logs, approx 3/4 tsp each
For egg wash:
  • 1 egg yolk + 1 tbsp milk (gently beaten)
Method:
1. Place the butter and condensed milk in the bowl of your stand mixer. Beat on medium speed until light and fluffy. Alternatively, you can use a spatula or a hand held mixer.
2. Add the egg yolks, and mix until just combined.
3. Add the plain flour and corn flour to the butter/condensed milk mixture in 2 additions, mix until just combined. The mixture should just come together to form a dough, and should not crumble when you roll it into a ball. If it crumbles, it is too dry – add some liquid. If it seems too sticky, add a little flour. This will change depending on climate( but not by very much).
4. Pipe out the pastry dough using your nastar mould, into 3 inch strips. If you do not have a nastar mould, you can wrap the dough up into the ‘enclosed’ version of pineapple tarts.
5. Place a ball of pineapple jam onto the pastry strip, and roll it up. Place on a silpat/parchment lined tray.
6. Repeat with all the remaining pastry and jam.
7. Brush the tarts lightly with the egg wash.
8. Bake in a 165’C oven (fan) for 20-25 minutes, or until golden brown.

chinese new year pineapple cookies 3

chinese new year pineapple cookies 4

Are these time consuming? Yes. But are they worth the effort? Definitely.

Happy baking!

Chinese braised nuts

Most Chinese restaurants always serve a little ‘snack’ the moment you sit down at the table. These Chinese braised nuts (groundnuts) are a common feature, and I personally think they are a fabulous appetiser. Being in London means I don’t get to eat this as often as I’d like – which means there was only one solution: make it myself.

chinese braised peanuts

I’ve tweaked the recipe over my last few attempts, and I am finally happy enough to post the recipe. It is a very simple recipe, but does need a prolonged cooking time to ensure the flavours absorb into the nuts.

chinese braised peanuts

Chinese braised nuts
  • 500g raw peanuts/groundnuts (I prefer skinless ones)
  • 1 cinnamon stick
  • 2 tsp five spice powder
  • 5 tbsp light soy sauce
  • 5 tbsp kicap manis (alternatively, use dark soy sauce + 1 tsp sugar)
  • 3 star anise
  • 60g rock sugar (any other white sugar is fine)
  • 4 cloves garlic
  • orange peel from one orange (optional)
  • 5 cups water (you may need a few extra cups of water, see below)
  1. Wash the peanuts, drain, and place in a slow cooker/heavy bottomed pot.
  2. Add all the other ingredients to the pot.
  3. Cook on low heat (covered) for 2-3 hours, until the nuts are cooked through. Gently stir the mixture every 30 minutes. You may need to add in extra water as you go along – do not let the liquid dry out, as this will cause the peanuts to burn.
  4. Eat warm, or leave to cool and eat at room temperature.
On another note, here’s wishing all my Chinese readers a very Happy Chinese New Year! 恭喜发财, 万事如意! 
I leave you with a photo of us tossing ‘yee sang/yu sheng’ (Chinese New Year salad). Essentially, the higher you toss, the more luck you get!
yee sang
May the year of the Horse bring much joy, good health, prosperity, and good food!

[instagrammed] Pandan bundt eggwhite cake

I first made this pandan bundt cake when I realised I had an ever-growing stash of leftover eggwhites in my freezer. I’m not a huge fan of meringue/macaron baking, and was trying to figure out what I could do with all those leftover eggwhites. And I have yet to purchase a chiffon cake tin.

I then came across this recipe for “Munavalgekook”, an Estonian eggwhite cake. I was intrigued, and not just because I couldn’t pronounce the name of said cake! So I made it. And absolutely loved it.

pandan bundt eggwhite cake

This cake has a slight pound-cake like texture, but has a beautiful delicate crumb due to the volume created by the whipped eggwhites. I personally prefer whisking eggwhites separately in cake recipes (even when the recipe calls for a whole egg), as I find cakes made this way result in a finer crumb.

And in keeping with my aim in life of putting a Malaysian twist on all my baked goods, I added a dash of pandan (screwpine) extract into the cake mix.

pandan bundt slicedNot a very good slice through the cake, is it? I really need to sharpen my knives… Oops.

Pandan bundt cake
Adapted from this recipe for Munavalgekook, from Nami-Nami

  • 6 large egg whites
  • 2 tbsp + 100 g caster sugar
  • 160 g plain flour
  • 1 heaped tbsp potato starch or cornflour
  • 1 tsp baking powder
  • 100 g melted butter, cooled slightly (I use salted butter)
  • 2 tbsp pandan extract (I never measure, I plonk in as much as I feel is necessary on that particular day…)

1. Preheat your oven to 170’C (fan assisted).
2. Sieve the flour, potato/corn starch, 100g of caster sugar, and baking powder into a bowl. Set aside.
3. Place egg whites and 2 tbsp of the caster sugar in a clean bowl. Whisk until the egg white/sugar mixture forms soft peaks.
4. Gently fold in the sieved flour/sugar mix into the whipped egg whites, until it forms a smooth mixture. Be careful when doing this as you do not want to knock the precious air bubbles out of the egg whites.
5. Slowly trickle the melted butter and pandan extract into the mixture, and gently fold until just incorporated.
6. Pour the cake mix into a bundt tin. Bake in the preheated oven for 30-45 minutes, until the cake becomes golden brown. A toothpick inserted into the cake should come out clean.
7. Remove from oven and let stand for 5 minutes.
8. Turn the cake out onto a wire rack to cool, then eat!